In this blog post I’ll explain how to create a simple Twitter client with Xamarin Forms and .NET Standard 2.0. You can download the source code of the app from my GitHub repository here.
Known issues The UWP flavor of the app crashes at the moment of this writing because of this known bug of Xamarin.Auth. The iOS version of the app is not tested. If you encouter the followin error or random deployment errors you need to delete bin and obj folder of the project and redeploy. Running Visual Studio 2017 as admin may help.
Could not locate c:\temp\IC6.Xwitter\IC6.Xwitter\packages.config. Ensure that this project has Microsoft.Bcl.Build installed and packages.config is located next to the project file. 2 IC6.Xwitter.Android21.pngCreate a new solution
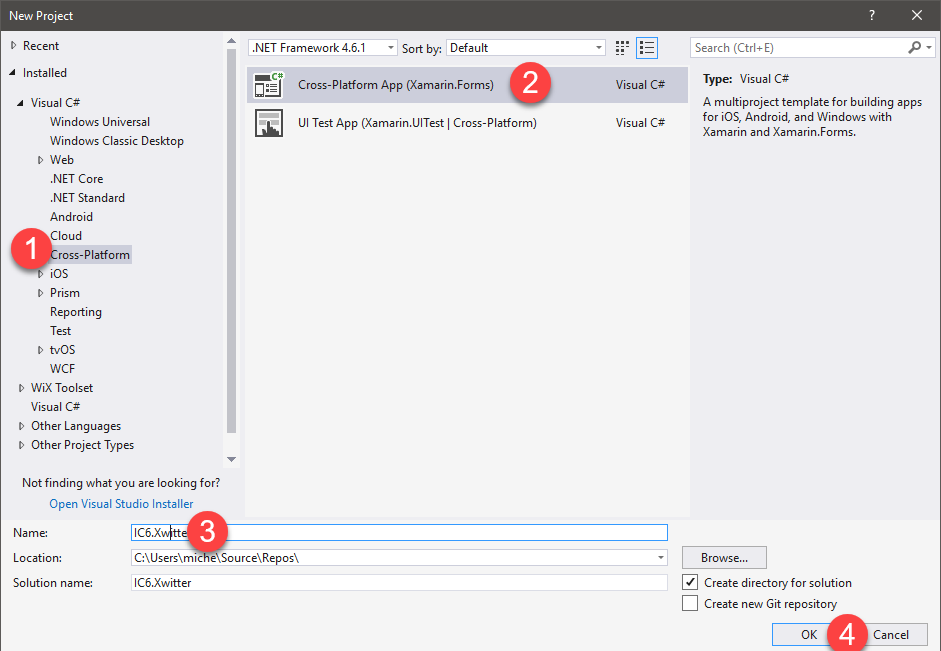
We start with a brand new Visual Studio Solution to create a Xamarin.Forms app from the File-> New Project menu.
- Cross-platform
- Cross-platform app (Xamarin Forms)
- We choose a name
- Hit OK.
 We set blank app, all the platforms, Xamarin.Forms as UI Technology and .NET Standard as Code Sharing Strategy.
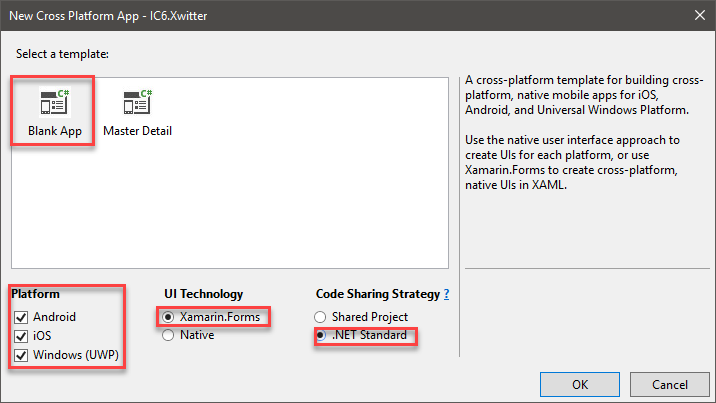
Reorganize some files
We now have a blank app ready to be developed. We reorganize some files in the shared library to reflect the MVVM architecture of our app. We create the Models, ViewModels and Views folders.
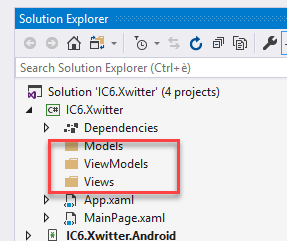 We move the MainPage.xaml with drag and drop into the Views folder because the MainPage is a view too.
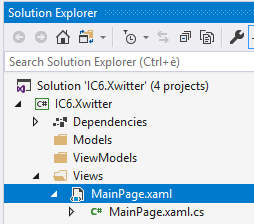 Now we have to move the MainPage class in the correct namespace: IC6.Xwitter.Views.
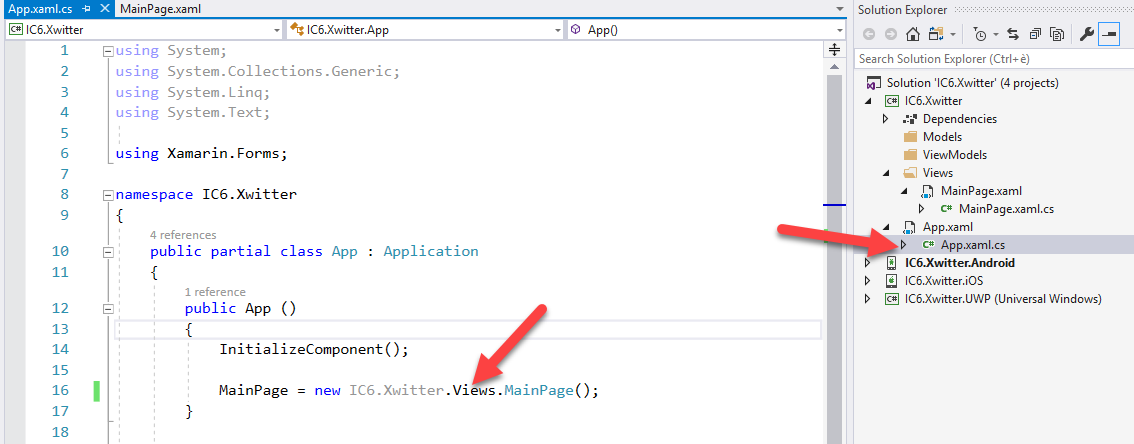
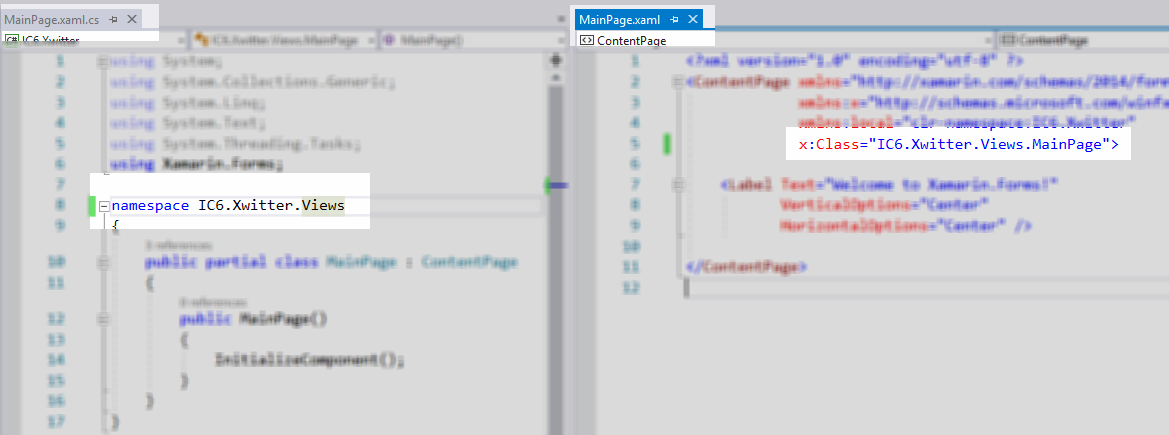 The last step for this section is to provide the right namespace in the bootstrap of the app as well.
Add NuGet Packages
Xamarin.Auth
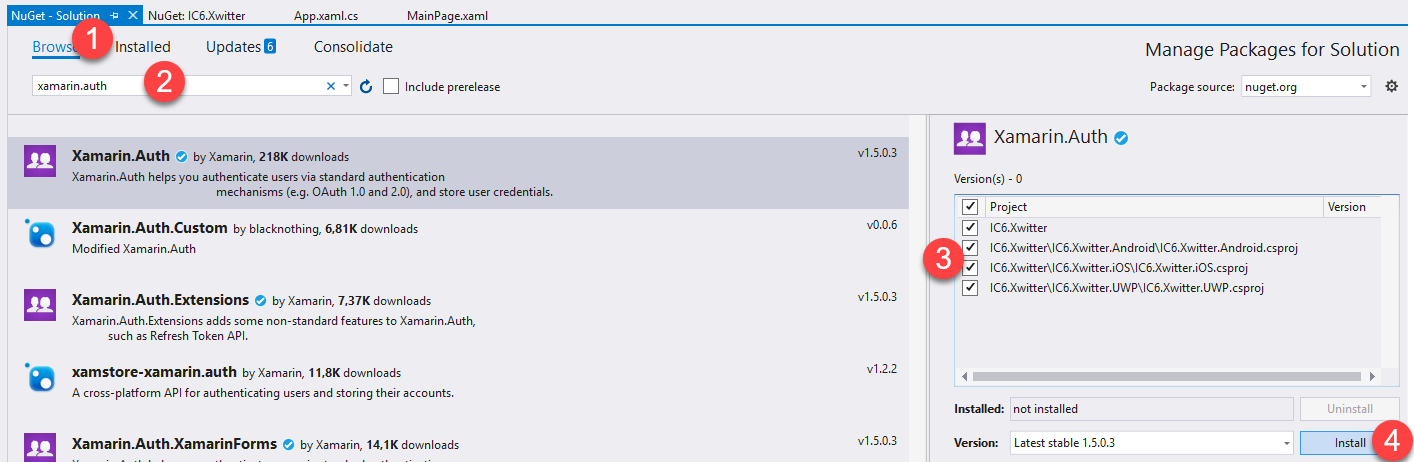
To make calls to the Twitter APIs we need to perform OAuth authentication. We can add the Xamarin.Auth NuGet package to avoid the implementation of OAuth. The Xamarin.Auth library provides a specific implementation for every platform because, for example, it needs to open a browser to perform the steps required by the OAuth standard. Because of that we need to add this package to every project in our solution. We right-click the solution in the Solution Explorer and then click on Manage NuGet Packages for Solution: now we search and add the Xamarin.Auth package for all projects.
 The next step is to configure initialize this library in every platform specific project because, as we said earlier, it has specific implementation for every OS.
Android
For the Android project we edit the MainActivity.cs file and we add this line of code:
global::Xamarin.Auth.Presenters.XamarinAndroid.AuthenticationConfiguration.Init(this, bundle);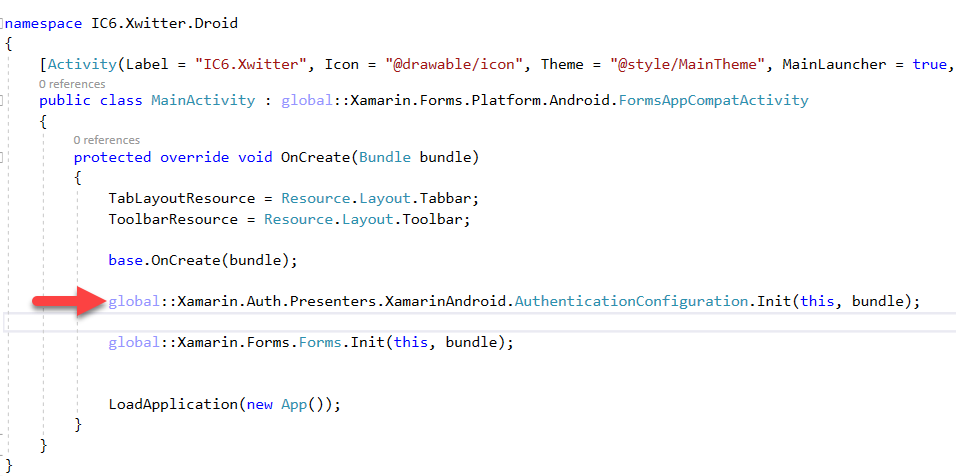
iOS
For the iOS project the concept is the same but we edit the AppDelegate.cs class with this line of code:
global::Xamarin.Auth.Presenters.XamarinIOS.AuthenticationConfiguration.Init();
UWP
The same concept is valid for the UWP world with this line of code in the App.xaml.cs file.
Xamarin.Auth.Presenters.UWP.AuthenticationConfiguration.Init();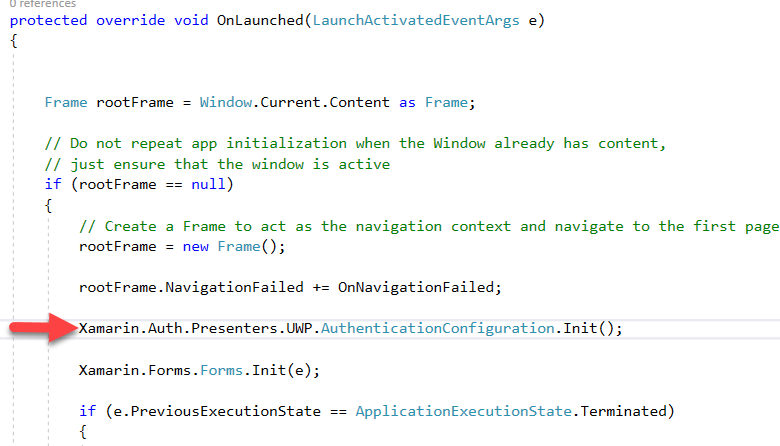
Linq to Twitter
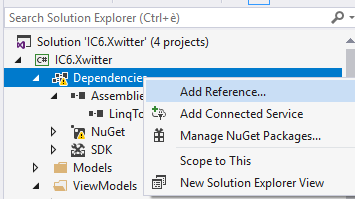
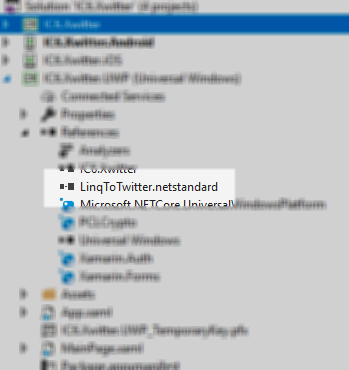
To avoid the heavylifting of maning the Twitter API calls we need the help of another library that enables us to access Twitter data like a database context: this library is very powerful and well done and it’s called Linq to Twitter. The .NET Standard version of this library is not available as a NuGet package at the moment of this writing but we can compile it by cloning the repository and build the .Net Standard project. I did this and the library is available here for download. Now we add a reference to this library into the shared project. We right-click the project, Add -> Reference -> Browse and we navigate to the file system location where we compiled or downloaded the library.
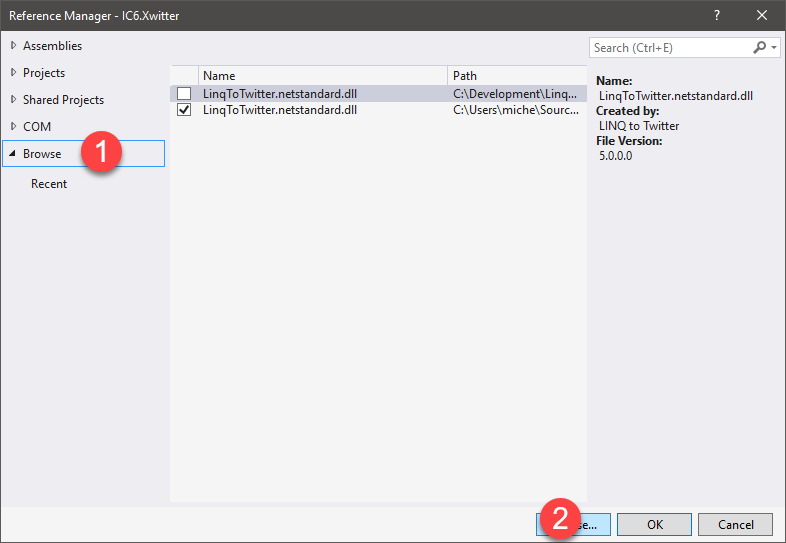 After that we added the library we click OK. The final result is something like the followin image.
 Warning! Important step!
Now we try tu build our solution to check if everything is fine. If we run into this error we need to manually add another NuGet Package to all the projects of the solution: PCLCrypto (it is a dependency of Xamarin.Auth). The same may apply for Microsoft.Bcl.Build.
Warning! Important step!
Now we try tu build our solution to check if everything is fine. If we run into this error we need to manually add another NuGet Package to all the projects of the solution: PCLCrypto (it is a dependency of Xamarin.Auth). The same may apply for Microsoft.Bcl.Build.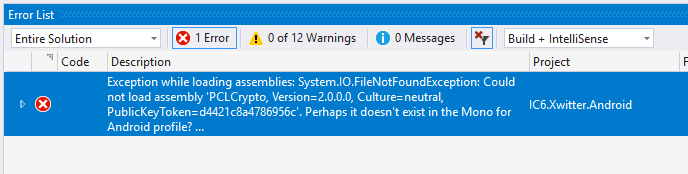 If we try to compile again everything should be fine, now.
Views
Now it time to code!
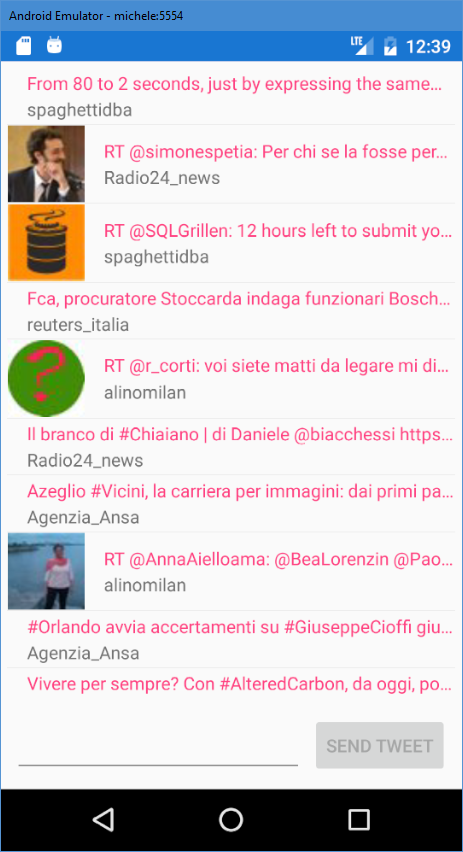
We start with the UI and we open the MainPage.xaml file in the Views folder of the shared library project. We write the XAML to achieve this layout.
We want to display our timeline as a list of tweets with the text, the author and the profile image.
At the bottom we want a place to input some text to do a tweet and then press a button to publish it.
[code language=“xml”]
Model
We create a Tweet class in the Model folder of the shared project to represent a tweet with some basic properties. [code language=“csharp”] namespace IC6.Xwitter.Models { public class Tweet { public ulong StatusID { get; set; } public string ScreenName { get; set; } public string Text { get; set; } public string ImageUrl { get; set; } } } [/code]
ViewModel
Now we create the ViewModel for the view. We create a new class in the ViewModels folder of the shared library called MainPageViewModel.cs.
To get the consumer key and the consumer secret for your app we need to register the application in the app portal of Twitter.
[code language=“csharp”]
using IC6.Xwitter.Models;
using LinqToTwitter;
using System;
using System.Collections.Generic;
using System.ComponentModel;
using System.Linq;
using System.Runtime.CompilerServices;
using System.Threading.Tasks;
using Xamarin.Forms;
namespace IC6.Xwitter.ViewModels
{
internal class MainPageViewModel : INotifyPropertyChanged
{
public Command _authenticateCommand;
private readonly ILoginStore _loginStoreService;
private IAuthorizer _auth;
private ILinqToTwitterAuthorizer _authSvc;
private bool _isRefreshing;
private string _newTweetText;
private Command _refreshTimeline, _sendTweet;
private List
View-Model deep dive
The above View-Model has some pieces of code that need explanation.
The constructor
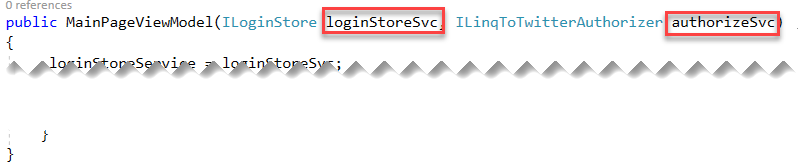 As we can see the constructor needs two parameters. The first is a reference to a service that manages the persistence of the user login information to avoid a new login everytime we open the app. The second is a reference to a service of the LinqToTwitter library to handle the exchange of the user’s token when accessing the Twitter API.
The ILoginStore and ILinqToTwitterAuthorizer interfaces are decalred in the shared library in the ILoginStore.cs file and ILinqToTwitterAuthorizer.cs file.
[code language=“csharp”]
using System;
using System.Collections.Generic;
using System.Text;
namespace IC6.Xwitter
{
public interface ILoginStore
{
void SetSecrets(UserSecrets secrets);
void SetSecrets(string oauthToken, string oauthSecret);
UserSecrets GetSecrets();
}
}
[/code]
[code language=“csharp”]
using System.Threading.Tasks;
namespace IC6.Xwitter
{
public interface ILoginStore
{
UserSecrets GetSecrets();
Task SetSecretsAsync(UserSecrets secrets);
Task SetSecretsAsync(string oauthToken, string oauthSecret);
}
}
[/code]
The UserSecret class is declared in the UserSecret.cs file in the root of the shared project.
[code language=“csharp”]
namespace IC6.Xwitter
{
public class UserSecrets
{
public string OAuthSecret { get; set; }
public string OAuthToken { get; set; }
}
}
[/code]
The LoginStore class and the LinqToTwitterAuthorizer class are declared in the root of the shared library with the LoginStore.cs and LinqToTwitterAuthorizer.cs names respectively. The LoginStore class leverages the Xamarin App class to get and set user preferences. The LinqToTwitterAuthorizer class uses base components of the LinqToTwitter API to handle the athorization needed by Twitter API.
[code language=“csharp”]
using System;
using System.Collections.Generic;
using System.Text;
using System.Threading.Tasks;
namespace IC6.Xwitter
{
class LoginStore : ILoginStore
{
private enum OAuth
{
OAuthToken, OAuthSecret
}
public UserSecrets GetSecrets()
{
string token = null;
string secret = null;
if (App.Current.Properties.ContainsKey(OAuth.OAuthToken.ToString()))
{
token = App.Current.Properties[OAuth.OAuthToken.ToString()].ToString();
}
if (string.IsNullOrEmpty(token))
{
return null;
}
if (App.Current.Properties.ContainsKey(OAuth.OAuthSecret.ToString()))
{
secret = App.Current.Properties[OAuth.OAuthSecret.ToString()].ToString();
}
if (string.IsNullOrEmpty(secret))
{
return null;
}
return new UserSecrets() { OAuthSecret = secret, OAuthToken = token };
}
public async Task SetSecretsAsync(UserSecrets secrets)
{
await SetSecretsAsync(secrets.OAuthToken, secrets.OAuthSecret);
}
public async Task SetSecretsAsync(string oauthToken, string oauthSecret)
{
App.Current.Properties[OAuth.OAuthSecret.ToString()] = oauthSecret;
App.Current.Properties[OAuth.OAuthToken.ToString()] = oauthToken;
await App.Current.SavePropertiesAsync();
}
}
}
[/code]
[code language=“csharp”]
using LinqToTwitter;
namespace IC6.Xwitter
{
public class LinqToTwitterAuthorizer : ILinqToTwitterAuthorizer
{
public IAuthorizer GetAuthorizer(string consumerKey, string consumerSecret)
{
return new ApplicationOnlyAuthorizer()
{
CredentialStore = new InMemoryCredentialStore
{
ConsumerKey = consumerKey,
ConsumerSecret = consumerSecret,
},
};
}
public IAuthorizer GetAuthorizer(string consumerKey, string consumerSecret, string oAuthToken, string oAuthTokenSecret)
{
var cred = new InMemoryCredentialStore
{
ConsumerKey = consumerKey,
ConsumerSecret = consumerSecret,
OAuthToken = oAuthToken,
OAuthTokenSecret = oAuthTokenSecret
};
var auth0 = new PinAuthorizer()
{
CredentialStore = cred,
};
return auth0;
}
}
}
[/code]
As we can see the constructor needs two parameters. The first is a reference to a service that manages the persistence of the user login information to avoid a new login everytime we open the app. The second is a reference to a service of the LinqToTwitter library to handle the exchange of the user’s token when accessing the Twitter API.
The ILoginStore and ILinqToTwitterAuthorizer interfaces are decalred in the shared library in the ILoginStore.cs file and ILinqToTwitterAuthorizer.cs file.
[code language=“csharp”]
using System;
using System.Collections.Generic;
using System.Text;
namespace IC6.Xwitter
{
public interface ILoginStore
{
void SetSecrets(UserSecrets secrets);
void SetSecrets(string oauthToken, string oauthSecret);
UserSecrets GetSecrets();
}
}
[/code]
[code language=“csharp”]
using System.Threading.Tasks;
namespace IC6.Xwitter
{
public interface ILoginStore
{
UserSecrets GetSecrets();
Task SetSecretsAsync(UserSecrets secrets);
Task SetSecretsAsync(string oauthToken, string oauthSecret);
}
}
[/code]
The UserSecret class is declared in the UserSecret.cs file in the root of the shared project.
[code language=“csharp”]
namespace IC6.Xwitter
{
public class UserSecrets
{
public string OAuthSecret { get; set; }
public string OAuthToken { get; set; }
}
}
[/code]
The LoginStore class and the LinqToTwitterAuthorizer class are declared in the root of the shared library with the LoginStore.cs and LinqToTwitterAuthorizer.cs names respectively. The LoginStore class leverages the Xamarin App class to get and set user preferences. The LinqToTwitterAuthorizer class uses base components of the LinqToTwitter API to handle the athorization needed by Twitter API.
[code language=“csharp”]
using System;
using System.Collections.Generic;
using System.Text;
using System.Threading.Tasks;
namespace IC6.Xwitter
{
class LoginStore : ILoginStore
{
private enum OAuth
{
OAuthToken, OAuthSecret
}
public UserSecrets GetSecrets()
{
string token = null;
string secret = null;
if (App.Current.Properties.ContainsKey(OAuth.OAuthToken.ToString()))
{
token = App.Current.Properties[OAuth.OAuthToken.ToString()].ToString();
}
if (string.IsNullOrEmpty(token))
{
return null;
}
if (App.Current.Properties.ContainsKey(OAuth.OAuthSecret.ToString()))
{
secret = App.Current.Properties[OAuth.OAuthSecret.ToString()].ToString();
}
if (string.IsNullOrEmpty(secret))
{
return null;
}
return new UserSecrets() { OAuthSecret = secret, OAuthToken = token };
}
public async Task SetSecretsAsync(UserSecrets secrets)
{
await SetSecretsAsync(secrets.OAuthToken, secrets.OAuthSecret);
}
public async Task SetSecretsAsync(string oauthToken, string oauthSecret)
{
App.Current.Properties[OAuth.OAuthSecret.ToString()] = oauthSecret;
App.Current.Properties[OAuth.OAuthToken.ToString()] = oauthToken;
await App.Current.SavePropertiesAsync();
}
}
}
[/code]
[code language=“csharp”]
using LinqToTwitter;
namespace IC6.Xwitter
{
public class LinqToTwitterAuthorizer : ILinqToTwitterAuthorizer
{
public IAuthorizer GetAuthorizer(string consumerKey, string consumerSecret)
{
return new ApplicationOnlyAuthorizer()
{
CredentialStore = new InMemoryCredentialStore
{
ConsumerKey = consumerKey,
ConsumerSecret = consumerSecret,
},
};
}
public IAuthorizer GetAuthorizer(string consumerKey, string consumerSecret, string oAuthToken, string oAuthTokenSecret)
{
var cred = new InMemoryCredentialStore
{
ConsumerKey = consumerKey,
ConsumerSecret = consumerSecret,
OAuthToken = oAuthToken,
OAuthTokenSecret = oAuthTokenSecret
};
var auth0 = new PinAuthorizer()
{
CredentialStore = cred,
};
return auth0;
}
}
}
[/code]
TL;DR
In this post we developed a simple Twitter client that shows the user timeline and can send tweets. Some libraries helped us to avoid the hard work of the OAuth standard and the Twitter API.
References
For more information about the library used in this post you can read the docs in the pages of the projects. XWitter GitHub Repository (https://github.com/phenixita/IC6.Xwitter) Xamarin.Forms guides (https://developer.xamarin.com/guides/xamarin-forms/) .NET Standard (https://docs.microsoft.com/en-us/dotnet/standard/net-standard) Twitter developer portal (https://developer.twitter.com/)